Hillarys Blinds Country Crafts Competition

My sewing project folder


A few weeks ago I saw online that Hillarys Blinds were giving away a yard of fabric to craft bloggers. The idea was that the bloggers would design and make an item and then blog about it, mentioning the Hillarys Blinds Country Craft Competition.

Well, you know what I’m like! Mention ‘free fabric’ and I’m there! Sign up for something? Yep, I’m your girl! I’m still jumping in without thinking!


I knew immediately what I wanted to make with the fabric. About three years ago I went to a couple of meetings of a group called Textile Without Limits [a contemporary quilting group which is part of The Quilters Guild. At one of the meetings I saw that a couple of people had special folders/wallets for their work and I thought what a good idea they were. Unfortunately I didn’t get a chance to look at them closely but the idea really took my fancy. I had never managed to get around to making such a folder but knew that that was what I was going to do with the lovely Wild Poppies from Hillarys Blinds.

Inside the back cover of the
sewing project folder

I sat down with my pad and began to sketch what I wanted to make and make notes about what features it should have.

Inside the back cover again, showing where
the wax and tailor’s chalk slide in


The project evolved during the making of it. Some stages could have been better timed and I should, perhaps, have given some areas more thought. No matter, I am pleased with my resulting project folder.

The detachable pincushion


I have included a needle case, scissor keep, tape measure grip, detachable pincushion, pockets for wax and tailor’s chalk and a large flap pocket.

If you fancy having a go at making one the step-by-step tutorial will be published on here tomorrow evening [Thursday 27 March 2014].

Thank you to Hillarys Blinds for the fabric and the chance to enter the competition. I hope you will all wish me luck!

Inside the front cover of the
sewing project folder

Way Outside The Comfort Zone

Today we are going to be working way outside my friend Elizabeth’s comfort zone! In fact we are so far outside she probably won’t even be able to see us! Elizabeth doesn’t like using thick crochet hooks or knitting needles and we are going to use a 12mm hook!

Abakhan are continuing to provide materials from time to time, for me to use on here and I am grateful to them for that support.


Today’s project is rather like my dining table which is, in fact, a sideboard. No, I haven’t gone mad! Allow me to explain.

In 1991 we were moving house and looking for a new dining table. My mother was visiting and I took her with me on one of my furniture-hunting expeditions. We went to an amazing emporium in Taunton, Somerset where we found a wonderful array of beautiful furniture. One item, in particular, took my fancy. It was a mahogany- veneered sideboard. I fell in love with it!

When we returned home I told John about the sideboard and insisted that he had to see it. He also fell in love at first sight and we bought it. We didn’t manage to find a suitable dining table for several years but always referred to the sideboard as being a dining table!

To return to today’s tutorial, the reason it is like my dining table, is that it was originally going to be a storage basket. When I began designing and making the basket I was unhappy with the look of my crochet so pulled it back. Yesterday I began again and was far happier with the quality of my crocheting. However, as I was working the vertical section it didn’t go quite as planned! Oops! Instead if pulling it back for a second time, I decided to continue and make it into a bowl. I rather like the shape that I have made. I hope you do, too!


Bossy Basket Tutorial
(UK terms are used throughout)

Materials
1 cone of Hoooked Zpagetti  (available from Abakhan here)
12mm crochet hook (click here to buy)

Instructions
1st Round – Ch 3, sl st into first ch.

2nd Round – 8 DC into ring. (8 sts)

3rd Round – Work 2 DC into each st. (16 sts)

4th Round – *Work 1DC into first st, work 2 DC into next st**. Repeat * to ** to end of round. (24 sts)

5th Round – Work as 4th round. (36 sts)

6th Round – #Work 1DC into first st, 1DC into second st and 2 DC into third st##. Repeat from # to ## to end. (48 sts)

7th Round – Working into the side (or stem) of each stitch, “work 1DC into each stitch. (48 sts)


8th Round – Work 1DC into every st. (48 sts)

9th Round – as 8th round.

10th Round – as 8th round.

11th Round – {Work 1DC into each stitch for next 11 sts, do not work into 12th stitch}. Repeat { to } to end. (44 sts)

12th Round – Work 1DC into next 5sts, ^Do not work into next stitch, work 1DC into each of the next 10 stitches.^^ Repeat from ^ to ^^ twice. Do not work into next stitch, 1DC into next 5 stitches. (40 sts)

13th Round – Work 1DC into each stitch.

Bind off.


NOTE: Working Round 7 creates a rim for the bowl to sit on.


STATISTICS

I used 285 gms of yarn

The bowl measures 23.5cm x 7cm (9.25″ x 3″)

Well, It’s Christmas

OK, so it’s Christmas Eve. For me, Christmas is anything but a celebration. Having said that, this year I have surprised myself by the amount of Christmassy things I have done. First, there was the Folded Fabric Christmas Tree, above. Then along came the Crazy Patchwork Christmas Tree.

Incredibly, I took part in a Secret Santa organised by Corinne Lapierre.

Next came the ‘interestingly shaped’ stockings for my Sweetie Pie, my Treasure and my Precious:

And I mustn’t forget the felt Christmas tree decoration:

I am pleased that I have managed to achieve all of the above, but, what I am most proud of is that I have managed to listen to Silent Night sung by Sinead O’Connor, without breaking down in floods of tears. 

Picture this: Christmas Eve 2001, I am sitting in my husband’s hospital room, holding his hand whilst he drifts in and out of consciousness. It is said that hearing is the last thing to go so I have brought in a radio in order that we can listen to Classic FM, as opera is his first love. But… I have completely forgotten that it is Christmas so, of course, they are playing carols. Then I hear Silent Night being sung by Sinead O’Connor. It has been my favourite carol since I was a small child but now it brings back memories of a certain Christmas that we shared, and creates new, piercingly painful, memories.

My husband died in my arms a few hours later and, since then Christmas has been so very hard to cope with. Whenever I heard any version of Silent Night I would be crying. However I had not heard this version from that night, until it played in a restaurant I was sitting in recently. It was painful, but bearable, and it showed me that I am able to begin looking at Christmas in a less painful light.

I have shared all of the above not for sympathy – I neither want nor need it – but to show how amazing it is that I am able to say the following:

I wish you all a wonderful Christmas.


A Quick Hanging Christmas Tree Decoration

Here is a tutorial for an easy Christmas tree decoration. I bought the materials for this project at the Abakhan store in Bolton, spending part of the sum given to me by Abakhan to use for tutorials on my blog.

Materials

  • Factory-made felt (I used one 9″ square for this project)
  • Complementary thread
  • Complementary beads (optional)
  • Size 10 Bead Embroidery needle
  • Piece of narrow ribbon about 7″ (17.5 cm) long

Using a mug, or similarly sized object, draw four, five or six circles on your felt. I was able to cut five circles from my square of felt. The more circles you use, the more intricate the design on your finished decoration.


Carefully cut out each circle.


Place half of the circles in a neat pile.


Place the ribbon so that a long loop is hanging outside the pile of circles and the ends are lying along the diameter of the circle. Carefully pin the ribbon in place. Place the remaining circles on top of the piles. Pin along the diameter of the circle. Place two more pins at different angles to hold the pile of circles neatly in place.


Using a double thickness of thread and an ordinary needle, stitch all of the circles together along the diameter, taking care to catch the ribbon in your line of stitching.


We will now begin to create the honeycomb effect of the decoration. I do this part by eye but you may prefer to measure, for accuracy.
Pinch together two leaves of the pile of circles and, using 2 or 3 small stitches, catch the edges together about a quarter of the way around the curved edge.

Repeat the previous step at the other end of the curved edge you have been working on.
Pinch the next two leaves together and repeat the previous two steps. Continue around the entire decoration until all leaves are attached to an adjoining leaf in two places.

Pinch together one leaf from an attached pair and one from the next attached pair. Stitch these two leaves together at the “equator” of the curved edge.

Continue around the equator until all pairs are attached to their adjoining pairs at the equator.

Begin attaching beads, if desired, using the bead embroidery needle.
I placed one bead at each junction of the honeycomb.

I also stitched four beads at the base of the decoration.

And there you have one quick, easy and cheap decoration for your own tree, or to give as a gift.

In The True Spirit Of This Blog…

When I first began writing my blog one of my main reasons for doing so was that I wanted to show other stitchers that other people make mistakes.

I had been reading several sewing blogs for a while but had found myself a little intimidated by the ability of the people writing the blogs. As I have admitted on here previously, I am pretty much a ‘fly by the seat of my pants’ girl. I am very impatient and that leads me to rush and to cut corners (sorry for the unintended pun!). I know that I should have learned my lesson by now but I haven’t – and I’m not convinced that I ever will!

A few weeks ago, when I was at my Thursday morning sewing group, I decided to make a Christmas stocking for each of my three grandchildren. Louise of Sew Scrumptious Fabrics had issued a free pattern for a Christmas stocking a little while earlier but, in true Bossymamma style, I did not have it with me and I didn’t want to wait until I was home! Cue me designing my own stocking. (Sorry, Louise, I didn’t use your template in the end.)

Oh! I was so organised! I sketched out some stockings until I had a shape I was happy with. Then I drafted larger sizes until I achieved what I thought was a good size. Next, I cut out a paper template which I used to make a plastic template. (Are you impressed, so far?) Finally, I began to cut my fabric. Oh dear! I had forgotten to add a seam allowance. Pretty stupid, huh?

I ploughed on and stitched the stockings. When all three were assembled I decided that I wanted to line them. (This is like a comedy of errors, isn’t it?) After much thinking and fiddling, I worked out how I was going to attach the linings and set about doing so.

Oh dear! The linings were quite a bit larger than the stockings, even though I had used the same templates. That was because this time I had remembered to add the seam allowances. (I really hope you have realised that this is not a ‘How To’ but most definitely a ‘How NOT To’!)

The final stage was to add the white cuff but I didn’t have any suitable fabric. I decided to use some wadding – this was not the cleverest idea I could have come up with as wadding is a real pain to sew by hand. Yesterday I attached the cuff to each of the stockings so they are sort of ‘finished’ – I just need to attach something to show which stocking belongs to which grandchild.

So here we have three Christmas stockings, each of which has an enormous foot topped by an ultra skinny leg. They’re not very good, are they? The fabric is sweet, though. So, instead of my grandchildren being able to leave them out on Christmas Eve for Santa Claus to fill, Nana will put a few bits and pieces in them just so they they are actually used!

How not to make Christmas stockings.

Feel free to laugh and scoff!

Crazy Patchwork Christmas Tree Wall Hanging

The sewing machine and computer keyboard at Bossy Towers have both been working so hard recently that steam [or was it smoke?] has been seen billowing from them! I have been making this Crazy Patchwork Christmas Tree using more of the fabric I bought from Abakhan using the voucher they gave me for blogging purposes. If you fancy having a go at making one, read on for the tutorial.

Crazy Patchwork Christmas Tree

Materials

  • An assortment of Christmas fabric scraps
  • A piece of plain fabric for the bucker [I used green]
  • Plain fabric for base to sew patchwork onto [this could be a piece of old curtain lining or sheeting]
  • 2oz wadding
  • Fabric for backing [I used plain red]
  • Brass ring or ribbon for hanging loop
  • Thread
  • Rotary cutter
  • Self-healing cutting mat
  • Ruler
  • Marker pencil for fabric
  • Scissors
  • Stitch unpicker [I needed mine several times!]

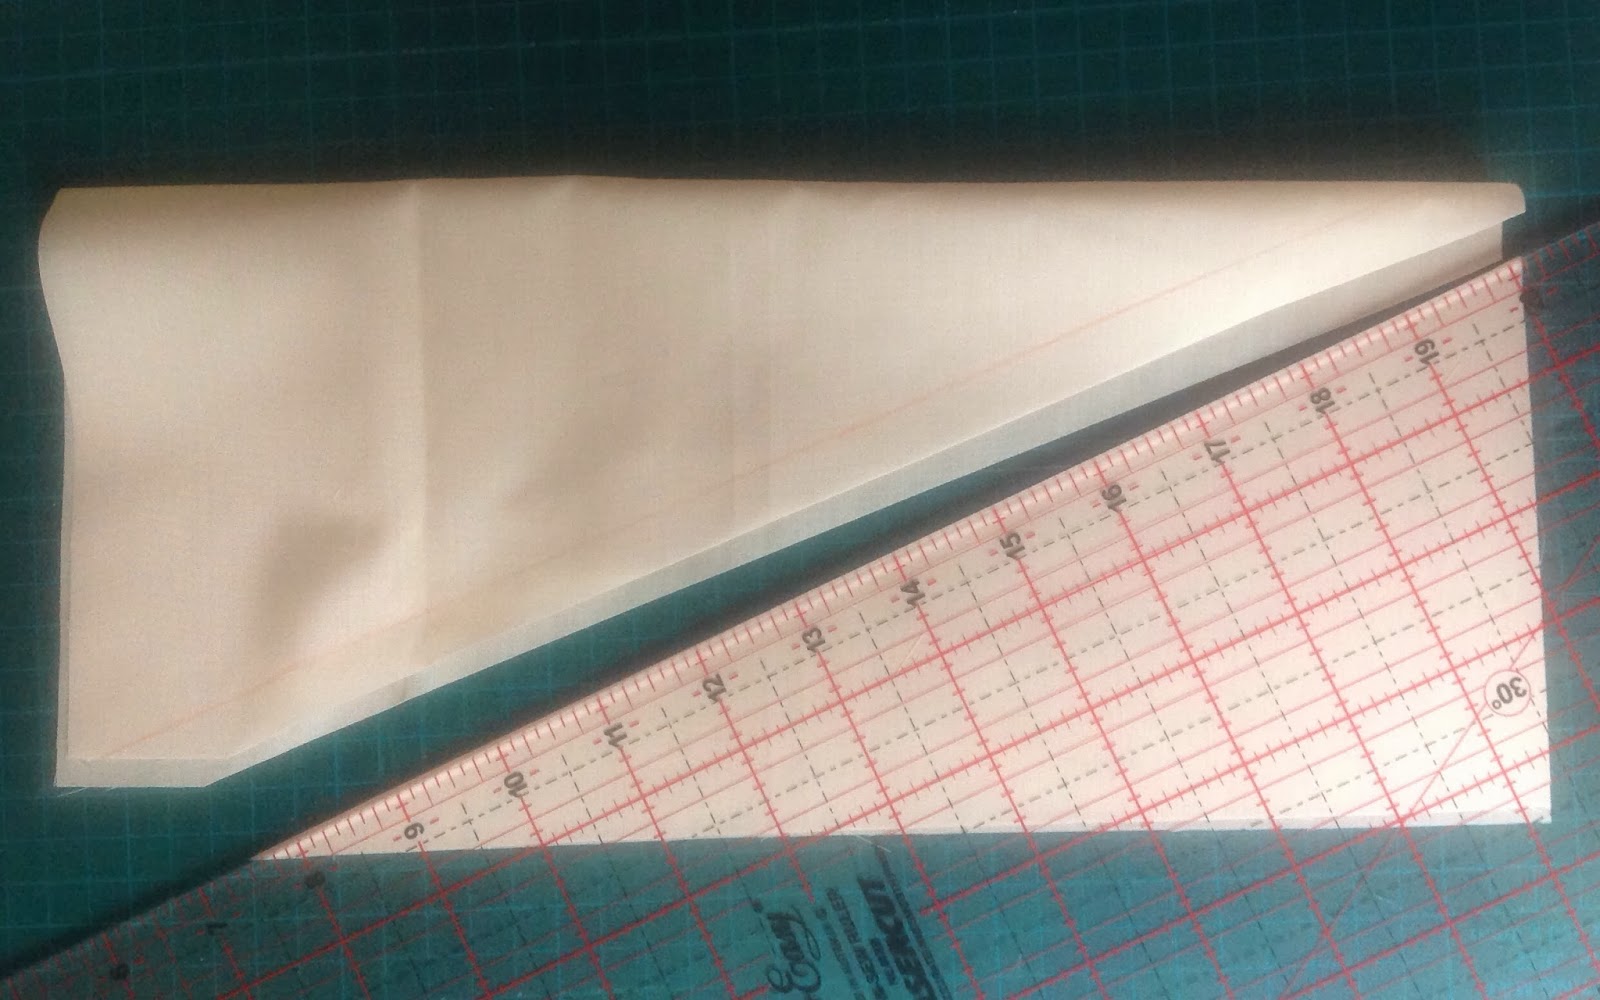
1.            With your base fabric and using your ruler on the cutting mat, cut a rectangle – this piece will be used to make the triangle for your tree. The tree can be made to whatever size you wish, although I found it difficult to be sure what the exact finished size would be. My rectangle measured 13” x 11”. The finished patchwork section measured 11.5” x 10”.

2.            To create a triangle, fold the rectangle in half along its longer sides. Place it on your cutting mat with the fold going from top to bottom. Place your ruler on the fabric beginning with its edge at the top of the fabric fold and angled out towards the long cut edge of your base fabric, leaving 0.5” between the ruler and the cut edge of the fabric.

3.            Using your marker pencil, draw a line along the edge of the ruler. This pencil line is a useful indicator when sewing the patchwork to ensure that the entire surface of your tree is covered.

4.            Slide the ruler across the fabric to leave a half inch strip between your drawn line and the edge of the ruler. Using the rotary cutter, cut the fabric. You now have your triangle on which to sew the patchwork.

5.            Open the triangle and lay flat with the pencil line showing. Mark a similar line, half an inch in from the second long side of the triangle.
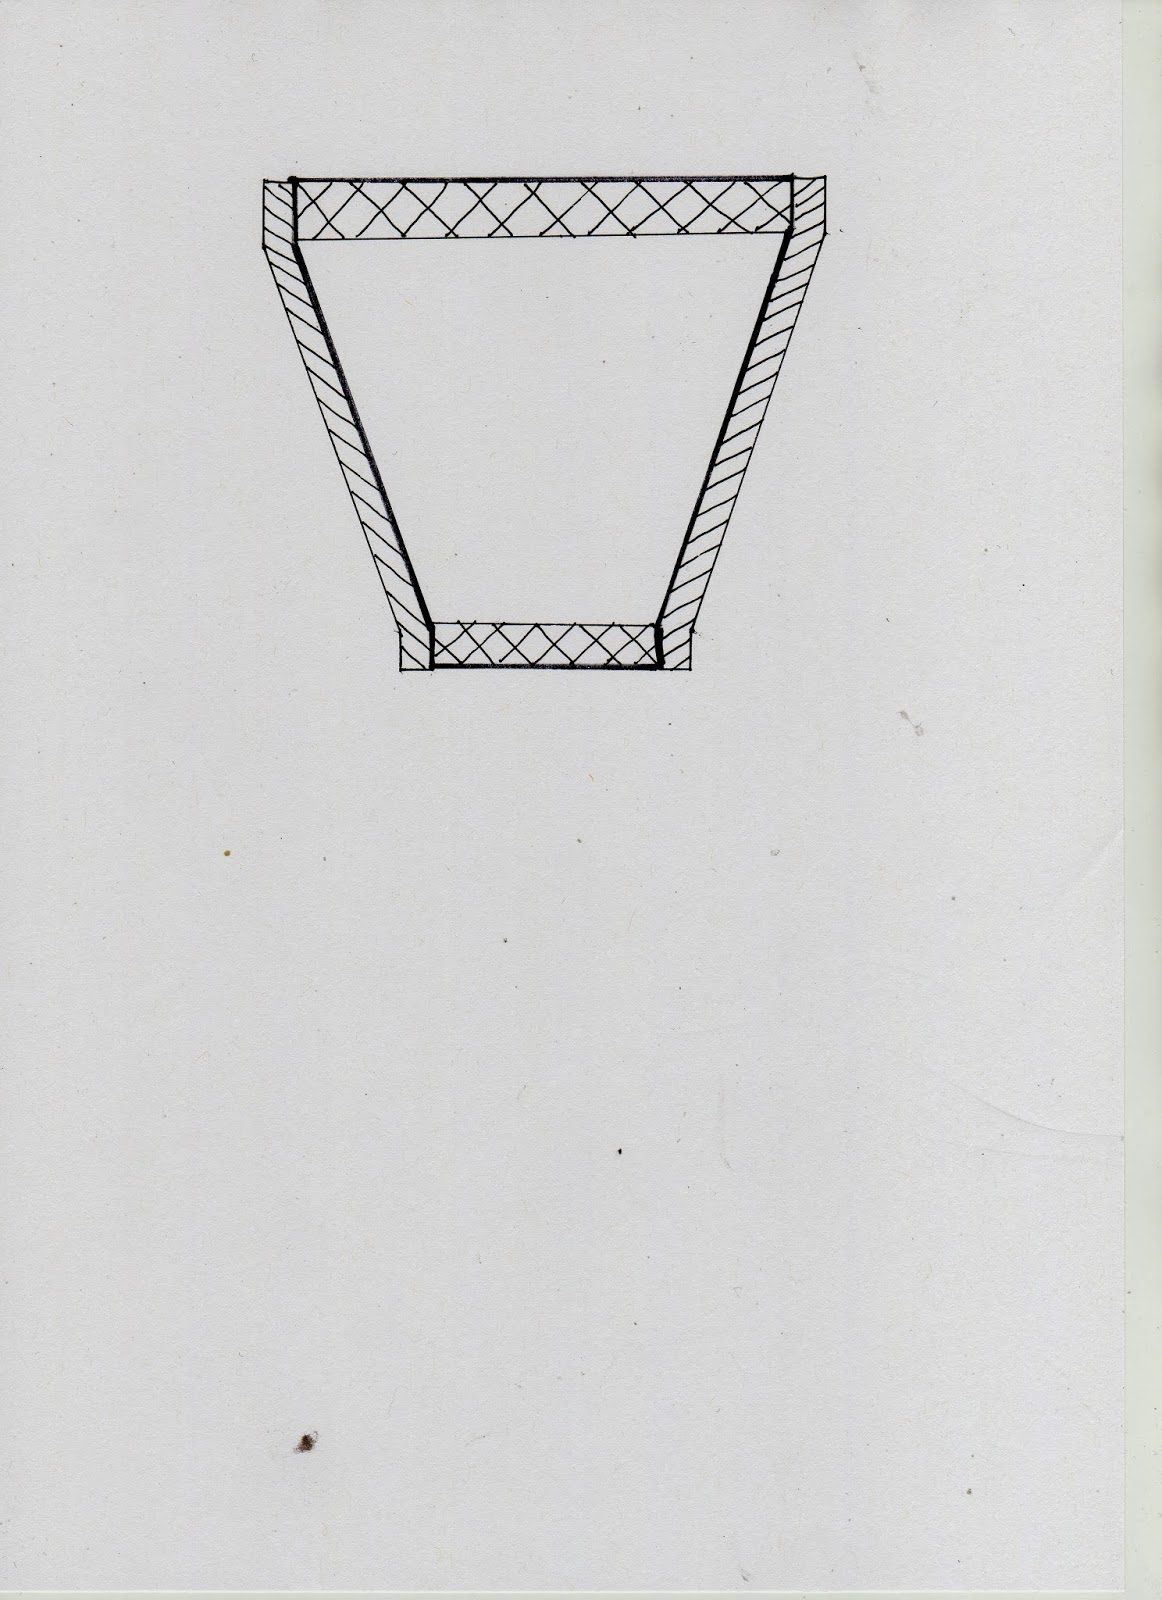
6.            Using the template attached to these instructions, cut one piece of green fabric, one piece of red fabric and one piece of wadding to make the bucket. The hatched areas are the seam allowances. The cross-hatched areas will be hidden when the tree is completed.

7.            Sandwich the three layers together: wadding at the bottom, then red fabric and topped with green fabric.
8.            Stitch together as shown in the photograph. Trim the bottom edge and bottom corners.

9.            Turn the bucket right sides out.

10.       At this point I decorated my bucket with a pre-programmed decorative holly stitch on my sewing machine.

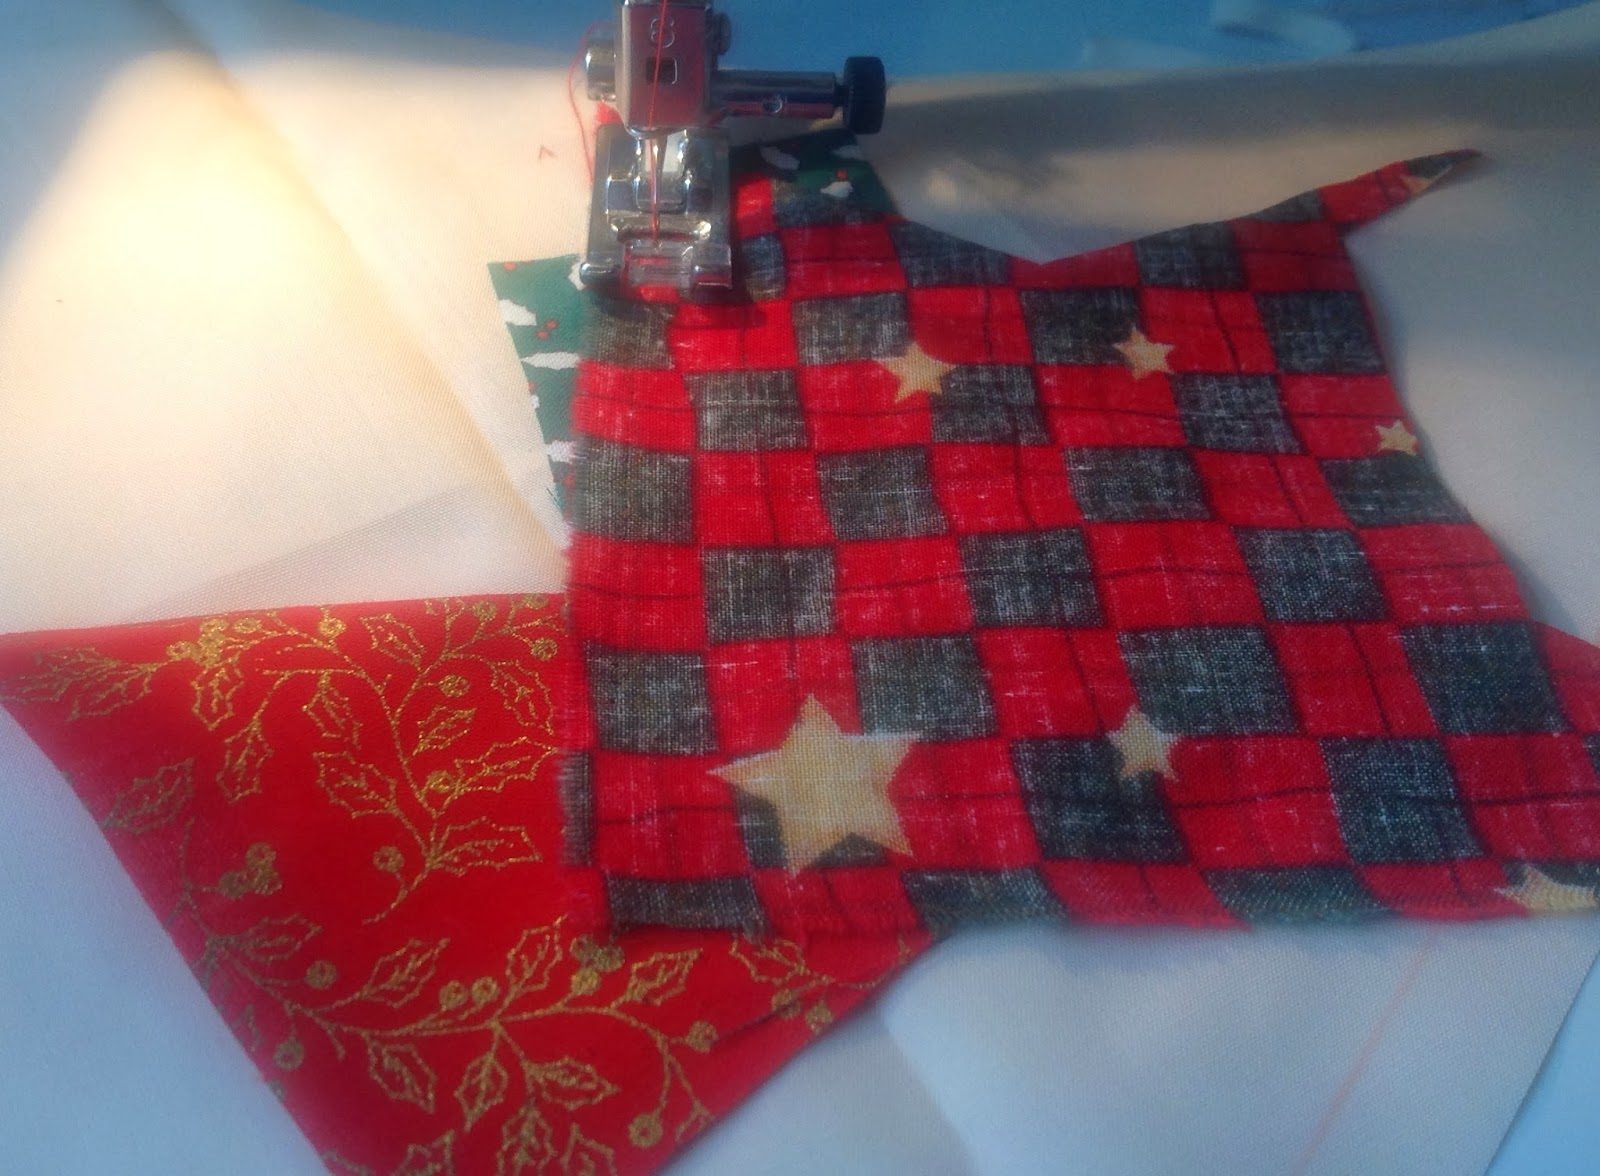
11.       Begin sewing pieces of Christmas fabric to the base. The method I used was ‘stitch and flip’ – see instructions below.

12.       Take a piece of fabric and place in the middle of the triangle, right side facing up. You may sew this in place if you find it easier, using a fairly long straight stitch on your machine.

13.       Take your second piece of fabric and lay it, face down, with one of its edges along one of the edges of your first piece. Stitch in place using a long straight stitch. You may trim the fabric once it has been attached.


14.       With your third piece of fabric and working around the first piece, attach it along the second edge of the first piece, ensuring no fabric edges are left showing.
Sewing it the wrong way!
        **I made my first mistake here, attaching the wrong side of the third piece of fabric to the edge of the first piece! Hence the need for the stitch unpicker!

Sewing it correctly this time!

15.       Continue the process of sewing on scraps as shown in the photos, working around your patchwork rather than concentrating on one area. If you are unhappy with how it looks just unpick it and try another piece.

16.       Note: When working towards the top of the tree, I found that I had to unpick and reattach several pieces as I had miscalculated what they would cover. If this happens to you, don’t panic, unpicking does not show on the finished item!

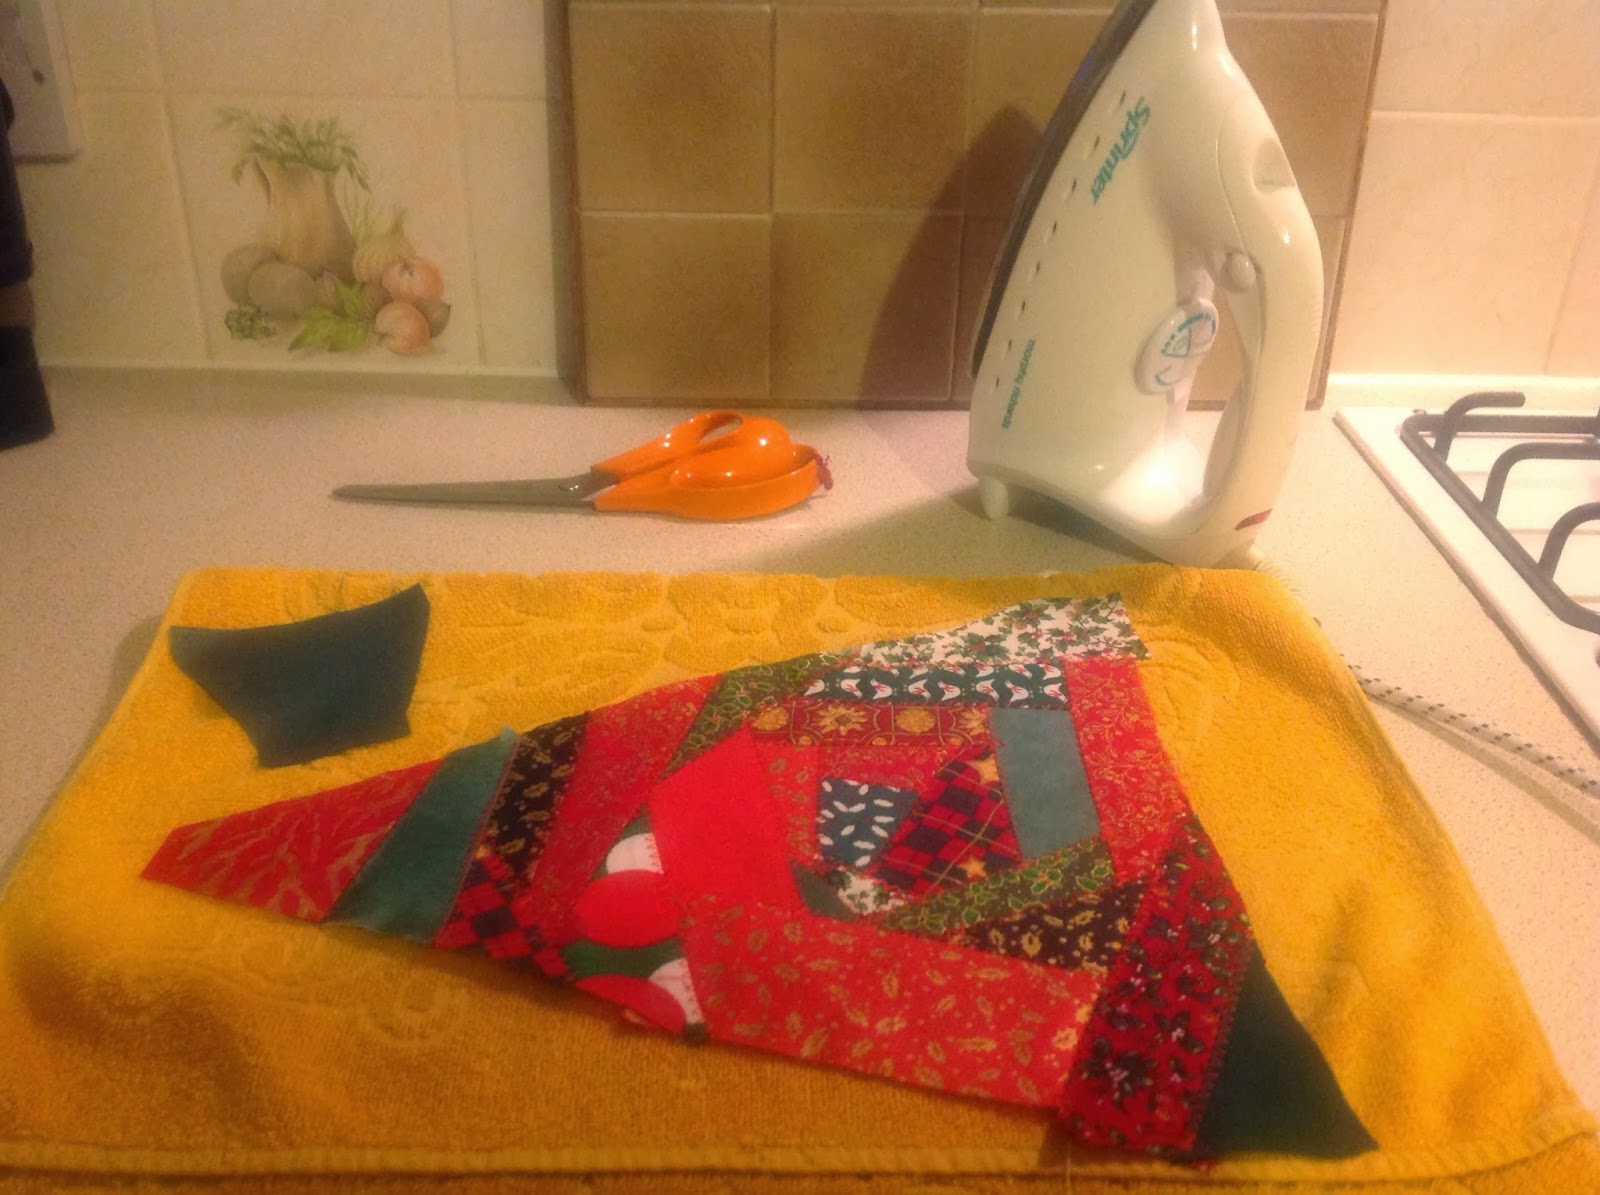
17.       When all pieces have been stitched in place, stitch along all joins using a decorative stitch – I used a zigzag stitch 5mm wide and 3mm long in red thread.

18.       Press the tree and the bucket firmly

19.       Using your patchwork as a template, cut the backing fabric and a piece of wadding.

20.       Pin the three layers of the tree together with the right sides of the fabrics facing each other and the wadding at the bottom.

21.       Insert the bucket between the two right sides of the tree fabric, with [i] the front of the bucket facing the right side of the tree, [ii] the widest end of the bucket [i.e. the top] lined up with the base of the tree, and [iii] the narrowest end [i.e. the bottom] pointing towards the top of the tree. [* The bucket must be inside the sandwich, not on the outside!]
22.       Pin the bucket firmly in place.
The two blue pins inside the
triangle are securing the bucket

23.       If you would like a ribbon hanging loop, insert the ribbon at this stage, between the patchwork and the red fabric, at the point of the tree, pointing down towards the bottom of the tree. [* The loop must be inside the sandwich, not on the outside!]

24.       Pin the ribbon firmly into place.

25.       Stitch the layers together, leaving a gap of about 3” along one of the sides.

26.       Trim the seams and corners.

27.       Turn the tree the right side out, taking care to neaten each of the points. Press.

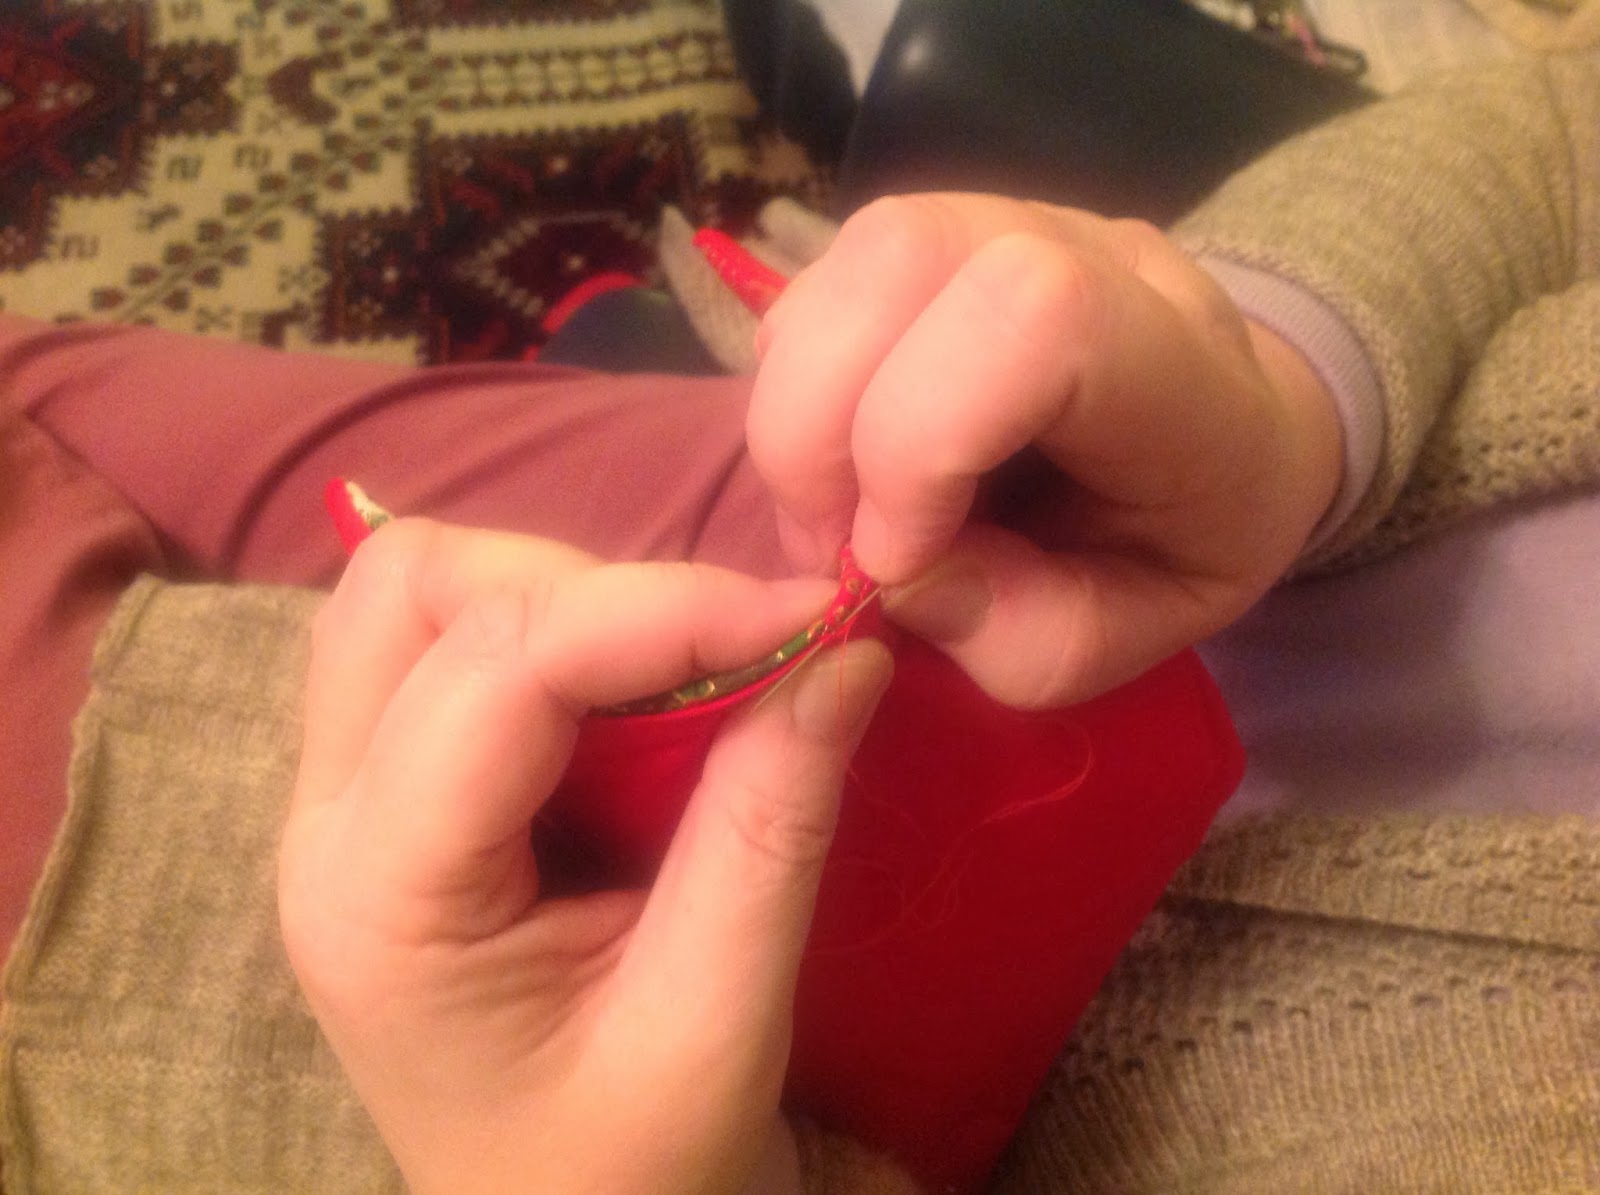
28.       Neatly slip stitch the gap closed.

29.       If you are using a ring to hang the tree, stitch it firmly into place on the back of the tree, near the top point, making sure that it is not visible from the front.
         At this point I also tied the three layers of the tree together with knots spaced
         evenly, but widely across the back, to keep the tree looking neat.

The finished tree

Template for bucket

If You Want To Get Ahead…

You’ve heard that saying? You know the one. “If you want to get ahead, get a hat”? Well, since posting the parcels to LILY, I have gone one step further and knitted a hat. Actually, I have knitted more than one. I hasten to add that I did not make the hat that I am modelling so beautifully (!!!) in the photograph above.

I have been busily knitting hats for the charity Priateli. There is a chap called John (I don’t know his surname) who lives in Rossendale, Lancashire and who does a lot of work for Priateli. The charity works in Bulgaria helping vulnerable people and a group of charity knitters that I belong to make and donate items to them.

Our group, the Friendly Elks (i.e. Friendly East Lancashire Knitters) are having a meeting later today and I thought I ought to try to do some catching up. I haven’t managed to attend a meeting since before my trip to Australia so I had better not turn up empty handed! Up until last week I had been furiously knitting items for Syrian refugees. However, since posting my two parcels of goodies to Turkey, I have been able to concentrate on knitting some bits for Priateli.

I have continued to use ends of balls and various other bits and pieces for this knitting. It is amazing how you can use strange mixtures of colour and texture but they still turn out OK.

I don’t use a pattern when I knit a hat. In fact, I don’t remember ever having used a pattern to knit a hat. I simply use guess work. Generally I use two or more strands of yarn so that (1) the hat is quick to knit, and (2) the colours can be blended more successfully.


My Super Simple Hat
When I begin knitting a hat, I cast on stitches until I think it looks a reasonable width. It doesn’t matter what size I knit as the hats are distributed amongst children of all ages. I work something like six or eight rows of rib.
On the following row I knit across the stitches, making an extra stitch in every seventh stitch. (This gives the hat a better shape.)
I work in stocking stitch until the work is the right sort of depth to fit the head of the age of child the hat is being made for. At the end of that section of stocking stitch I begin decreasing. I usually start by knitting two stitches together on every sixth stitch along the entire row. On every successive row, keeping stocking stitch pattern correct, continue decreasing as follows: decrease stitches by working 5 stitches between each decrease along the entire row, then 4 stitches between, then 3, then 2, one. At that point work the entire row by knitting two stitches together until two or three stitches remain.
Three stitches: slip one, knit two together, pass slip stitch over. Two stitches: knit the last two together and tie the end. Sew along the side seam. Voila! One completed hat.

I’m Not The Only One Making Bags

As you know, I’ve made quite a few bags during the past week. Today I got more people making bags. The sewing group that I began has had a break for various reasons but last week Jacqui and I were talking and decided it was time to revitalise it. So, today we had a meeting in our new venue – Coronation Road Library in Radcliffe. The library is closed on Thursdays so we are able to spread out around the building.

We started the morning with a cup of coffee and a look at the group’s stash and then began working on making bags. The bag we are making will be familiar to some of you as it is the same design that I made at the sewing show in Adelaide recently.


I particularly like the design as it is based on origami. I have a couple of other bag designs that are made in a similar way, one of which I have made several times whereas I haven’t actually made one in the second design – another one for my To Do List!

I haven’t forgotten that I said I would do a tutorial – I will prepare it shortly. In the meantime, here’s the same photo again so that you may enjoy looking at it while you wait!


A Good Idea In So Many Ways

Those of you who have read my blog regularly will probably have guessed that I like making items for charity. I don’t like crafting and making things just for the sake if it, I like to have a purpose. If that purpose helps others, so much the better, if it costs little, or nothing, that’s a bonus and, if it involves recycling or upcycling then, woohoo, I’ve hit the jackpot! Well, today’s idea pretty much ticks all of those boxes! (Sorry, Peter, but that seemed the most appropriate phrase.)

What can you do with all those scrappy bits and pieces of yarn that are left after you have knitted something? You know, those tiny balls of yarn that seem too good to throw away even though there’s not enough to make anything? Or, the lengths that are left when you have finished sewing up? Well, now you can use them – you can make a wearable object! Don’t believe me? Read on…

First of all, it doesn’t really matter what ply yarn you have as this project is very forgiving.

Whenever you find you have odds and ends of yarn that you don’t think can be used for anything, chop them up into 4″ to 6″ (10cm to 15cm) lengths.

Then, knot the pieces together leaving a tail on each end of roughly one inch (2.5cm). Mix and match colours in any way that you wish and don’t worry about knotting a piece of 4-ply onto a piece of aran – it really doesn’t matter.

Wind the knotted length into a ball.

You may begin to feel a little concerned at this point, but there is no need. OK, the balls look scruffy and unappealing but just wait and see! When you have a fair sized ball you are well on the road to success.

You are going to use the ball of scraps to make… a hat!

Take any basic beanie pattern, a small amount of ordinary yarn – I usually use double knitting – and a pair of 4mm or 4.5mm knitting needles. You may use a circular needle in either of those sizes, if you prefer. Using your preferred casting on method [I like to use long-tail cast on] cast on stitches as per the pattern.

Knit about an inch [2.5cm] of rib in the ordinary yarn. Change to the knotted yarn and work in garter stitch or stocking stitch as per the pattern to complete the hat. Apologies for not supplying an actual pattern but I never use one – I always guess! As the hat is going to a charity it doesn’t matter what size it is as there will always be someone that it fits. See? I told you it was forgiving!

When you have sewn up the hat, make sure all ends are hanging on the outside of the hat. Your finished hat should look something like one of these on the outside:


And like these on the inside:

And there you have it! A unique shaggy hat that is warm and cosy to wear, cuts down on waste, costs virtually nothing to make and helps someone less fortunate than yourself.

Happy knotting and knitting!

Christmas Gift Bag (for dining table present)


These small decorative bags are ideal for small gifts on the table at Christmas Dinner or other celebratory occasions.

*  *  *  *  *  *  *  *

Materials (makes 4 bags):

  • 1 Fat Quarter of Kona Solid in Ruby
  • 1 Fat Quarter of Kona Solid in Basil
  • 44” (112cm) Narrow ribbon per bag
  • 1 Small safety pin
  • Thread
  • Measuring grid or ruler
  • Rotary cutter or dressmaking scissors
  • Dressmaking pins
  • Hand sewing needle
  • Sewing machine (optional)
  • A small gift

*  *  *  *  *  *  *  *

Instructions:

1.      Press both pieces of fabric to remove all creases


2.      Measure and cut a square with 8½ inch (21cm) sides from each of the two fabrics

 
3.      Pin the two squares together with right sides facing leaving a gap of 2½ to 3 inches (6 to 7.5 cms) along one side, marked by two pins at each end, for turning fabric inside out after stitching.

 
4.      Using a straight stitch, stitch the two squares together starting and finishing at the pins marking the gap and leaving a ¼ inch (5mm) seam allowance all round.


5.      Snip off each corner to reduce bulk

 6.      Turn the bag inside out so that the right sides of your fabric are on the outside. Take particular care to ensure the point of each corner is neat.
7.      Neatly secure the gap closed using slip stitch.


8.      Press well.


9.      Decide which of the fabrics is to be the outer and which the inner of your bag.


10. Optional: Sew a decorative stitch all around the square near the edge of the fabric.


11. Lay the bag down with the outer side fabric uppermost.
12.  Fold each corner over about 2½ inch (6.5cm) from its point so that the inner fabric is showing.


13. Stitch along each folded corner leaving a 3/8” seam allowance to create a channel for the ribbon. Do not stitch along the edges where the outer fabric still shows uppermost.


14. Take the 44 inch (112 cm) length of ribbon and cut into two 22 inch (56 cm) lengths.
 

15. Using the safety pin as a guide on the end of the first piece of ribbon, thread the ribbon through the channels. Stitch or tie the ends together to secure.


16. Thread the second ribbon through the channels, starting directly opposite where threading of the first piece was begun. Stitch or tie the ends to secure them together.

17. Place your gift in the bag.
 

18. Holding one ribbon in your left hand and the other in your right, pull the two ribbons apart to tighten the top of the bag.
 

19. Tie the two ribbons into a bow.
 

20. Your gift bag is complete.


*  *  *  *  *  *  *  *